How to Replace a Catalytic Converter Step-by-Step DIY Guide
If you are wondering how to replace a catalytic converter, you are in the right place. A failing converter can trigger a check engine light, cause sluggish acceleration, produce a rotten egg smell from the exhaust, and eventually lead to a failed emissions test. The faster you act, the less stress it puts on the rest of your exhaust system and engine. Replacing a catalytic converter on most modern vehicles is a manageable DIY job, and this guide covers every single step from start to finish so you can do it safely and correctly.

James Mitchell
Senior Automotive Writer
12+ years writing clear, practical guides on vehicle maintenance and emissions systems.
Key Notes To Know Before Replacing Catalytic Converter at Home:
Is Your Catalytic Converter Actually the Problem?
Before spending money on a replacement, confirm the converter is genuinely at fault. Diagnostic trouble codes P0420 or P0430 point to converter inefficiency, but a faulty downstream oxygen sensor can trigger the exact same codes. Have both your upstream and downstream oxygen sensors tested before ordering a part. If the sensors are fine and the codes persist, a replacement is almost certainly the right call.
Also shake the converter when the engine is cold. A loud rattle from inside the unit means the internal ceramic substrate has broken apart, which is a clear sign the converter needs to go. Other confirmed replacement triggers include a melted or collapsed substrate, coolant or oil contamination of the catalyst, physical impact damage to the housing, or a persistent emissions test failure with the converter confirmed as the root cause.
Direct Fit vs. Universal Converter
Always choose a direct fit converter over a universal one for DIY installation. A direct fit unit is engineered specifically for your vehicle’s make, model, engine size, and year. It bolts on without any cutting or welding and is the only realistic option if you are doing this yourself at home. Universal converters require cutting and welding to fit and should only be used by those with exhaust fabrication experience.
Also check your local emissions compliance requirements before purchasing. California, Colorado, Maine, and New York require CARB-approved converters. All other states require EPA-compliant units. Installing the wrong certification type will cause a failed emissions test even if the new converter is functioning perfectly.
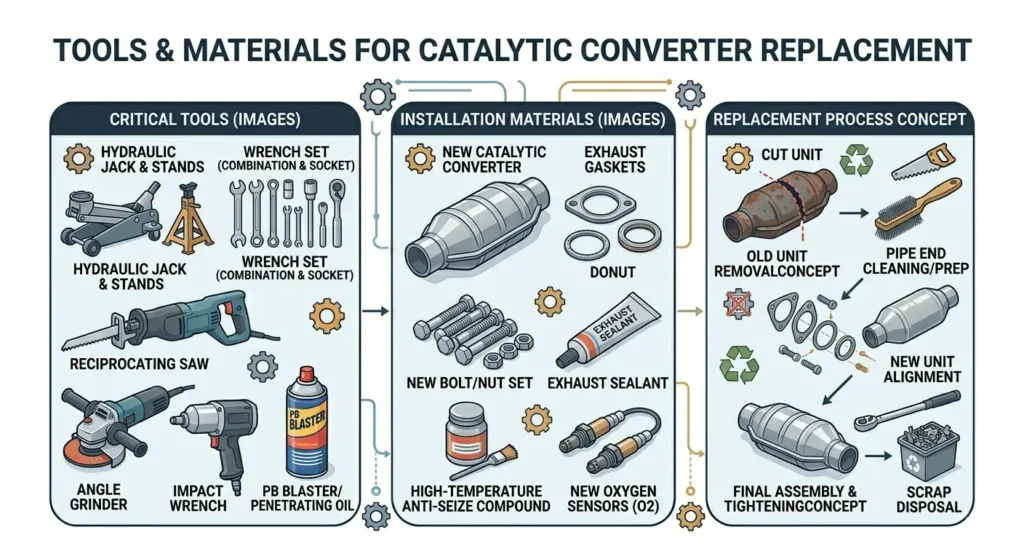
Tools and Materials Required for Replacement
Gather everything before you lift the vehicle. Stopping mid-job to find a missing tool creates unnecessary delays and can leave your car in an awkward state.
Tools you will need:
• Floor jack and at minimum two jack stands rated for your vehicle weight
• Socket set in both metric and standard sizes including deep sockets
• Ratchet and breaker bar
• Torque wrench
• Oxygen sensor socket (22mm with a wire channel slot)
• Penetrating oil such as PB Blaster or WD-40
• Wire brush and gasket scraper
• Rubber mallet
• Wheel chocks
• Safety glasses and heat-resistant gloves
• Creeper or padded mat for working underneath the vehicle
• Reciprocating saw (only needed if any bolts need to be cut)
Tools you will need:
• Correct direct fit replacement catalytic converter for your vehicle
• New exhaust flange gaskets (never reuse old ones)
• New exhaust bolts and nuts (never reuse corroded hardware)
• Anti-seize compound
• Exhaust joint sealant if applicable
How to Replace a Catalytic Converter: Full Step-by-Step Guide
Step 1: Let the Engine Cool Down Completely
Never start this job on a warm or recently driven vehicle. The exhaust system retains heat for a long time even after the engine is switched off. Allow at least two full hours after the vehicle was last driven before getting underneath it. Working on a fully cold engine eliminates any burn risk and makes the exhaust components safer to handle throughout the job.
Step 2: Raise and Secure the Vehicle
Park on a completely flat, solid surface. Engage the parking brake and place wheel chocks behind the rear wheels. Use your floor jack at the manufacturer-specified lift points and raise the vehicle high enough to give yourself comfortable working clearance. Place jack stands firmly under the vehicle frame or designated support points and lower the vehicle onto them. Never work under a vehicle supported only by a floor jack. Confirm the vehicle is completely stable before sliding underneath.
Step 3: Soak All Hardware With Penetrating Oil
This is the most important preparation step and the one most people skip or rush. Spray penetrating oil generously onto every bolt, nut, and clamp on both the inlet flange, the outlet flange, any mounting brackets, and the oxygen sensor threads. Let it soak for a minimum of 20 to 30 minutes. If you can apply it the evening before and let it work overnight, you will find the hardware releases far more easily the next day. This step alone is what separates a smooth two-hour job from a broken bolt situation.
Step 4: Disconnect the Oxygen Sensor
Most vehicles have an upstream oxygen sensor and a downstream oxygen sensor. Depending on your specific vehicle, one or both sensors may be threaded directly into the converter body. Use the oxygen sensor socket to remove any sensor mounted in the converter itself. Disconnect the electrical connectors carefully and move the wiring safely out of your work area. If any sensor is threaded into the adjacent exhaust pipe rather than the converter body, you may be able to leave it in place during removal, but watch the wire closely to avoid damage.
Step 5: Remove the Heat Shield
The heat shield is the stamped metal cover bolted or clipped over the converter. Remove all fasteners and set the shield aside. Heat shields on older vehicles can be fragile and prone to crumbling. Handle carefully as the edges can be sharp.
Step 6: Inspect the Exhaust Manifold
With the heat shield off, inspect the exhaust manifold for cracks, warping, or heavy deposits before proceeding. Installing a new converter onto a cracked manifold will destroy the replacement unit prematurely. If the manifold shows damage, repair or replace it before continuing.
Step 7: Unbolt the Inlet Flange
The inlet flange connects the converter to the exhaust manifold or the downpipe coming off it. This connection sees the most heat cycles and is typically the most corroded. Use your breaker bar and the correct socket. Apply slow, steady pressure. If a bolt refuses to move, apply more penetrating oil and wait. If a bolt snaps, you will need to drill it out and re-tap the threads or replace the stud before proceeding.
Step 8: Unbolt the Outlet Flange
The outlet flange connects the converter to the downstream exhaust pipe toward the muffler. This connection is usually easier than the inlet. Remove all bolts or clamp hardware. Tap the joint apart gently with a rubber mallet if needed. Never use a metal hammer directly on flange faces.
Step 9: Remove the Old Converter and Inspect It
With both flanges disconnected and any mounting brackets removed, the converter is now free. Maneuver it out carefully. Shake it again now that you have it in hand. Look inside the inlet opening for signs of collapsed, melted, or heavily sooted substrate. This confirms your diagnosis and helps you identify any upstream problem such as an oil-burning engine or rich fuel condition that contributed to its failure. If an upstream fault caused the failure, fix it before installing the new unit or the replacement will fail for the same reason.
Step 10: Clean the Flange Sealing Surfaces
Use the gasket scraper and wire brush to clean both the inlet and outlet flange faces completely. Remove every trace of old gasket material, carbon, and rust until the metal surfaces are clean and flat. This step takes about ten minutes but is essential for a leak-free installation. An exhaust leak at a flange joint produces a ticking noise at idle and can allow harmful gases to enter the cabin.
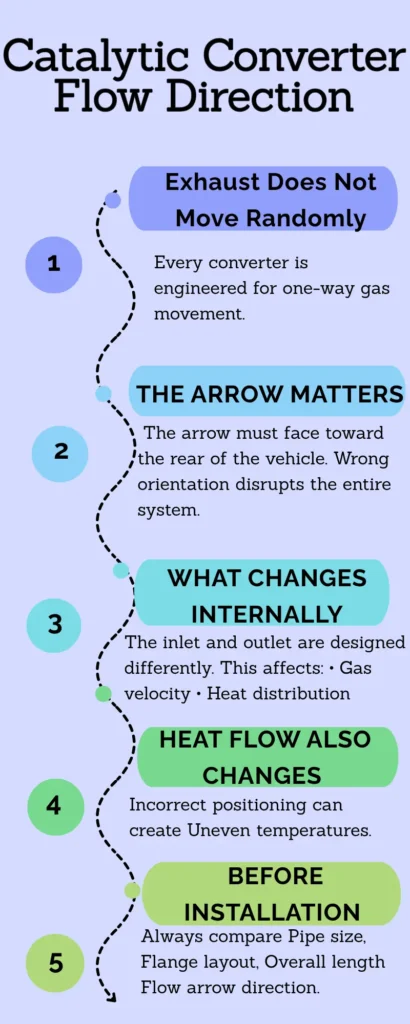
Step 11: Check the Flow Direction on the New Converter
Before installation, hold the new converter next to the old one and compare the overall length, flange patterns, and pipe diameters to confirm a correct match. Then locate the flow direction arrow on the new converter body. Every catalytic converter has a defined inlet and outlet. The arrow must point toward the rear of the vehicle in the direction exhaust flows. Installing it backwards will prevent it from working and may trigger a check engine light immediately.
Step 12: Position and Install the New Converter
Place new gaskets at both the inlet and outlet connections. Position the converter in place and hand thread all bolts at both flanges before tightening any of them. This is a critical sequence. Fully tightening one flange before the other is even engaged puts stress on the unit and can cause a leak at the untightened end. Once all hardware is hand tight and both flanges are seated squarely, apply anti-seize compound to the bolt threads and torque all hardware to the manufacturer’s specification for your vehicle using your torque wrench. Reinstall any mounting brackets that were removed.
Step 13: Reinstall the Oxygen Sensor
Thread the oxygen sensor back into its bung by hand first to avoid cross-threading, then torque it to specification (typically 30 to 44 ft-lb depending on application). Reconnect the electrical connector firmly. Route the wiring away from the converter body and any heat shield edges to prevent heat damage or chafing.
Step 14: Reattach the Heat Shield
Refit the heat shield and secure all fasteners. This is not optional. The heat shield protects fuel lines, brake lines, wiring harnesses, and the vehicle floor from the significant radiant heat a catalytic converter produces at normal operating temperature.
Step 15: Lower the Vehicle and Test
Raise the vehicle off the jack stands, remove the stands, and lower the vehicle to the ground. Start the engine. If the new converter was coated in a protective paraffin layer from the factory, a small amount of white smoke may appear from the exhaust for the first few minutes. This is completely normal and will clear quickly. Listen carefully at all exhaust joints for any hissing or ticking sounds that indicate a leak. Then take the vehicle for a test drive of at least 15 minutes at varied speeds including highway speed to bring the converter up to full operating temperature.
How Long Does It Take to Replace a Catalytic Converter?
The time to replace a catalytic converter depends almost entirely on the condition of the existing hardware. On a vehicle where all bolts release cleanly, a home mechanic can complete the full job in two to three hours. If bolts are heavily seized or one snaps and must be extracted, the same job can stretch to five hours or more.
The time to change a catalytic converter at a professional shop is typically under one hour. Mechanics use lifts and air tools that make removal and installation dramatically faster, and shops that specialize in exhaust work can often complete the job while you wait.
Can You Replace a Catalytic Converter Yourself?
Yes, on most vehicles made since the mid 1990s. If the converter is bolted or clamped rather than welded in place, a home mechanic with basic tool skills and patience can complete the job successfully. The steps are logical and not technically complex. What makes or breaks a DIY replacement is managing seized fasteners and having the right tools on hand.
If you ask yourself, can I replace a catalytic converter myself if I have never done exhaust work before? The honest answer is yes, provided you take your time, follow the safety steps correctly, and do not rush the penetrating oil process. However, if the converter on your vehicle is welded in rather than bolted, professional installation is the right choice.
How Hard Is It to Replace a Catalytic Converter?
On a standard difficulty scale, a bolted direct fit replacement sits at moderate. Replacing brake pads is easier. Replacing a timing belt is harder. The steps themselves are straightforward. What creates difficulty in practice is corrosion. Exhaust hardware on vehicles in wet or salty climates corrodes aggressively, and seized bolts require patience, penetrating oil, and sometimes heat from a propane torch to release without snapping.
How to Fix a Catalytic Converter Without Replacing It
If your converter’s substrate is physically intact and the issue is fouling from carbon buildup caused by a rich-running engine, fixing a catalytic converter without replacing starts with a quality cleaner treatment. Products like Cataclean or similar fuel-based converter cleaners are added to a low tank of fuel and burned off at sustained highway speeds. This approach works well for mild to moderate fouling and has restored function to many converters that were borderline on efficiency codes.
Fixing a catalytic converter by physical cleaning involves removing the unit, soaking it in a hot water and degreaser solution, rinsing thoroughly, and allowing it to dry completely before reinstalling. This method can address heavier carbon deposits that a fuel treatment cannot fully reach.
Neither method works on a converter with a collapsed substrate, internal melting, or precious metal contamination from coolant or oil. In those cases, fixing a catalytic converter cannot solve the issue and replacement is the only option.
How to Remove a Catalytic Converter Safely
Removing a catalytic converter without breaking bolts or damaging surrounding components comes down entirely to preparation and patience. Soak all hardware the night before if possible. Use the correct socket size for every fastener. Apply steady controlled torque rather than sharp impact force. Protect oxygen sensor wiring throughout the process. Have a reciprocating saw available as a last resort if a bolt snaps and cannot be extracted by conventional means.
How to Change a Catalytic Converter: Common Mistakes to Avoid
Understanding how to change a catalytic converter is one thing. Avoiding the mistakes that cause repeat failures or exhaust leaks is another. The most common errors made during replacement are:
Skipping the upstream diagnosis. Installing a new converter without fixing the engine fault that destroyed the original is the single biggest mistake. An oil-burning engine or a consistently rich air-fuel mixture will destroy a new converter in a fraction of its normal service life.
Reusing old gaskets. Old exhaust gaskets compress and conform to the original surfaces over years of heat cycling. They will not seal properly on a new converter. Always install new gaskets.
Tightening one flange before the other is aligned. Always hand thread all hardware at both flanges simultaneously before applying any torque.
Not reinstalling support brackets. Every bracket exists for a reason. Leave one off and you will be dealing with cracked flanges or exhaust leaks within months.
DIY vs. Professional Replacement at a Glance
|
Consideration |
DIY Replacement |
Professional Replacement |
|---|---|---|
|
|
|
Higher, parts plus labor |
|
|
|
|
|
|
|
Any type including welded |
|
|
|
Very low |
|
|
Moderate set needed |
None for the owner |
|
|
|
|
|
|
|
Welded units, high corrosion, no tools |
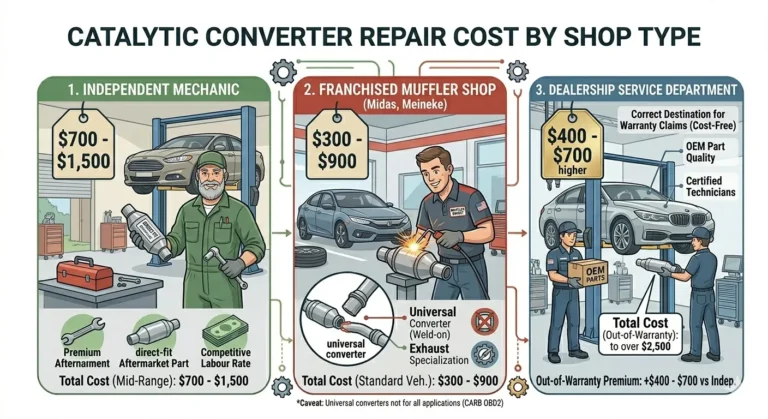
Replacement Cost Reference
|
Vehicle Type |
DIY Parts Cost |
Professional Total Cost |
|---|---|---|
|
|
|
$300 to $700 |
|
|
|
|
|
|
|
$700 to $2,000 |
|
|
|
$1,500 to $3,500 |
James Mitchell
Senior Automotive Writer
12+ years writing clear, practical guides on vehicle maintenance and emissions systems.